Windows에서 openssl로 인증서 생성하고 MQTT로 테스트하기
회사에서 MQTT를 SSL/TLS로 테스트해야 하는 경우가 생겼는데, 기존에 나와있는 Eclipse Mosquitto로 하려다가 이왕 하는 김에 Javascrpt로 MQTT Broker랑 Client (Pub, Sub)를 직접 구현해보기로 했다.
전체적으로 MQTT Broker와 Client를 구현하기 위한 라이브러리들은 다음과 같다.
두개의 라이브러리를 받고 예제를 각 라이브러리들의 github에서 사용법을 찾아보면 된다.
Mosca 예제 (server.ts)
import mosca from 'mosca';

import { moscaSettings } from './options';

const server = new mosca.Server(moscaSettings, () => {
    console.log('Mosca server is up and running');
});

server.on('clientConnected', (client: mosca.Client) => {
    console.log('Client connected', client.id, new Date());
});

server.on('clientDisconnected', (client: mosca.Client) => {
    console.log('Client Disconnected:', client.id, new Date());
});

server.on('published', (packet: mosca.Packet, client?: mosca.Client, callback?: () => void) => {
    console.log('Published', packet.payload, client && client.id, callback);
});
MQTT.js 예제 (publisher.ts)
import mqtt from 'mqtt';

import { mqttClientOptions, mqttsClientOptions } from './options';

const client = mqtt.connect(mqttsClientOptions);

client.on('connect', () => {
    client.subscribe('presence');
    client.publish('presence', 'Hello mqtt');
    client.end();
});

client.on('error', (error) => {
    console.log(error);
});
MQTT.js 예제 (subsriber.ts)
import mqtt from 'mqtt';

import { mqttClientOptions, mqttsClientOptions } from './options';

const client = mqtt.connect(mqttsClientOptions);

client.on('connect', () => {
    client.subscribe('presence');
});

client.on('message', (topic, message) => {
    console.log(topic, message);
    client.end();
});

client.on('error', (error) => {
    console.log(error);
});
옵션 (options.ts)
import { IClientOptions } from 'mqtt';
import fs from 'fs';

export interface ClientOptions extends IClientOptions {
    passphrase?: string;
    secureProtocol?: string;
}

export interface MoscaLogger {
    name?: string;
    level?: number | string;
}

export interface MoscaSecure {
    port?: number;
    keyPath?: string;
    certPath?: string;
}

export interface MoscaSettings {
    port: number;
    logger?: MoscaLogger;
    secure?: MoscaSecure;
}

export const mqttClientOptions: ClientOptions = {
    host: 'localhost',
    port: 1883,
    protocol: 'mqtt',
    connectTimeout: 10 * 1000,
};

export const mqttsClientOptions: ClientOptions = {
    host: 'localhost',
    port: 8443,
    protocol: 'mqtts',
    protocolId: 'MQIsdp',
    protocolVersion: 3,
    secureProtocol: 'TLSv1_method',
    reconnectPeriod: 5 * 1000,
    rejectUnauthorized: false,
    connectTimeout: 10 * 1000,
    ca: [fs.readFileSync('keystore/ca/ca.crt')],
    key: fs.readFileSync('keystore/client/client.key'),
    cert: fs.readFileSync('keystore/client/client.crt'),
};

export const moscaSettings: MoscaSettings = {
    port: 1883,
    logger: {
        name: "secure",
        level: 40,
    },
    secure: {
        port: 8443,
        keyPath: 'keystore/server/server.key',
        certPath: 'keystore/server/server.crt',
    },
};
이제 문제는 Openssl 인데, Windows에서 Openssl을 사용하기 위해 2가지 방법이 있다.
- 바이너리로 묵인 것을 다운로드 받기.
- 소스를 받아서 직접 빌드하기.
2번은 귀찮기 때문에, 1번을 찾아보고 다운로드 받았다.
https://code.google.com/archive/p/openssl-for-windows/downloads
다운로드 받고나면 압축을 푼 경로로 들어가 bin에서 Windows Command Line으로 직접 openssl명령어를 치면 되지만, 매번 할 수 없기 때문에 이것도 javascript로 keygen을 만들었다.
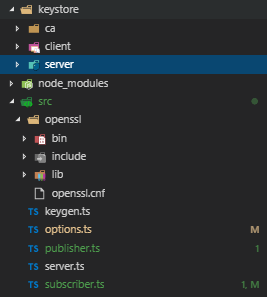
프로젝트 경로로 맞춰 명령어를 실행하기 위해 openssl을 압축을 풀어 프로젝트 내부로 옮기고, 마찬가지로 openssl로 생성된 키와 인증서를 프로젝트 내부에 두기 위해 프로젝트 내에 keystore 폴더를 만든다.
Openssl로 생성해야되는 키와 인증서는 자체 서명된 CA, Server, Client가 모두 필요하기 때문에 keystore 하위 폴더로 ca, server, client를 만든다.
위에 작성된 MQTT Broker, Client, Options를 포함하여 이렇게 생긴 폴더 구조가 생길 것이다.
그 다음 openssl 명령어를 실행하기 위한 Keygen을 작성한다.
Keygen (keygen.ts)
import { execSync, ExecSyncOptions } from 'child_process';
import path from 'path';

type Status = 'all' | 'ca' | 'server' | 'client' | 'verify';

const argsLength = process.argv.length;
let status: Status = 'all';
if (argsLength > 2) {
    status = process.argv.slice(2)[0] as Status;
}

const opensslPath = 'openssl/bin/openssl';
const opensslConfPath = `openssl/openssl.cnf`;
const binPath = path.resolve(__dirname, opensslPath)
const confPath = path.resolve(__dirname, opensslConfPath);
const execSyncOption: ExecSyncOptions = {
    stdio: 'inherit',
}

/**
 * Create CA
 */
const caKeystorePath = 'keystore/ca';
const caKeyPath = `${caKeystorePath}/ca.key`;
const caCrtPath = `${caKeystorePath}/ca.crt`;
if (status === 'all' || status === 'ca') {
    execSync(`${binPath} req -new -x509 -days 1024 -extensions v3_ca -keyout ${caKeyPath} -out ${caCrtPath} -config ${confPath}`, execSyncOption);
}

if (status === 'verify') {
    execSync(`${binPath} x509 -text -in ${caCrtPath}`, execSyncOption)   ;
}

/**
 * Create server key
 */
const serverKeystorePath = 'keystore/server';
const serverKeyPath = `${serverKeystorePath}/server.key`;
const serverCsrPath =  `${serverKeystorePath}/server.csr`;
const serverCrtPath = `${serverKeystorePath}/server.crt`;
if (status === 'all' || status === 'server') {
    // execSync(`${binPath} genrsa -des3 -out ${serverKeyPath} 2048`, execSyncOption);
    execSync(`${binPath} genrsa -out ${serverKeyPath} 2048`, execSyncOption);
    execSync(`${binPath} req -out ${serverCsrPath} -key ${serverKeyPath} -new -config ${confPath}`, execSyncOption);
    execSync(`${binPath} x509 -req -in ${serverCsrPath} -CA ${caCrtPath} -CAkey ${caKeyPath} -CAcreateserial -out ${serverCrtPath} -days 1024`, execSyncOption);
}

/**
 * Create client key
 */
const clientKeystorePath = 'keystore/client';
const clientKeyPath = `${clientKeystorePath}/client.key`;
const clientCsrPath = `${clientKeystorePath}/client.csr`;
const clientCrtPath = `${clientKeystorePath}/client.crt`;
if (status === 'all' || status === 'client') {
    // execSync(`${binPath} genrsa -des3 -out ${clientKeyPath} 2048`, execSyncOption);
    execSync(`${binPath} genrsa -out ${clientKeyPath} 2048`, execSyncOption);
    execSync(`${binPath} req -out ${clientCsrPath} -key ${clientKeyPath} -new -config ${confPath}`, execSyncOption);
    execSync(`${binPath} x509 -req -in ${clientCsrPath} -CA ${caCrtPath} -CAkey ${caKeyPath} -CAcreateserial -out ${clientCrtPath} -days 1024`, execSyncOption);
}
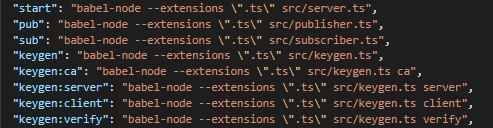
최종 적으로 npm script를 작성한다.
package.json script
TL;DR
npm run keygen을 실행하면 CA, Server, Client 순으로 키와 인증서를 생성하기 위한 입력들이 나오고 질문에 맞춰 입력하면 되고, 최종적으로 keystore 폴더 하위에 ca, server, client에 키와 인증서들이 생성된다.
그런 다음, npm start, npm run sub, npm run pub을 실행하여 메시지를 주고 받는 것을 확인해보면 된다.

아래 완성본을 받아서 테스트 해보면 된다.
완성된 예제
